We highly recommend purchasing your Injen air intake here:
Injen Cold Air Intake
Wednesday, March 5, 2008
Monday, March 3, 2008
Injen Cold Air Intake Installation
 We begin by removing the factory air intake tube from the throttle body on the engine and the air box on the fender well. Two clamps are the only items that secure the rubber hose. |
 The stock air box lifts out easily once you've removed the screws that attach it to the fender well. |
 We raised the car on a lift to access the lower air intake and muffler (yes, muffler) Acura installed to keep air intake sound to a minimum. The tube attaches to the muffler and the muffler is held in place with a few screws. |
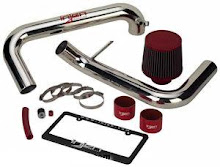
 Here is the first piece of the new Cold Air Intake system. This tube will have the air filter attached to it in the fender and this is where the cold air will come from. You'll need to feed the tube up into the engine compartment where it is held in place with a large nut. |
 With the lower pipe in place we installed the new high-flow air filter next. It'll reside up in the fender where it will be somewhat protected from the elements. However, if you live in a particularly wet environment prone to significant rain, you should consider relocating it directly in the engine compartment as a large amount of ingested water can damage the engine. |
 The second pipe is installed next. A urethane connector allows you to attach the pipe to the throttle body where it's held in place with two clamps, one for the throttle body and one for the pipe. |
 Here is the urethane sleeve connector for the upper and lower pipes. Before securing the lower pipe with the flange and nut we made sure our connection to the upper pipe was secure. |
 Here is the flashy finished product. You'll immediately notice the air intake sound since it's a noticeable growl over stock. Most power will be achieved at higher rpm where additional air is needed most. |
Subscribe to:
Posts (Atom)